3D printing is a revolutionary technology that is gaining popularity these days. This fantastic method is being used by more and more people, from hobbyists to professionals, to make custom parts for their projects.
Despite the many advantages that 3D printing offers, there is one significant drawback: layer lines. These solid print layers can cause surface flaws that could ruin the look of your project if they are not fixed properly.
In this blog post, we’ll guide you through all you need to know about getting rid of those pesky layer lines and quickly achieving great-looking prints!
What Are Layer Lines, and Why Do They Form in 3D Prints?
Layer lines are solid print layers that are visible in 3D prints. They are caused by the way the plastic is deposited on the print bed, and their visibility increases with layer height.
3D-printed parts’ sides are made up of hundreds of separate layers. These layers will form one continuous surface if everything is in order.
However, if only one of these layers has a problem, it is usually undeniable from outside the print.
On the sidewalls of your part, these incorrect layers may show as lines or ridges.
Frequently, the flaws will appear cyclical, meaning the lines will repeat (i.e., once every 15 layers).
The Causes of Layer Lines
The 3D-printed pieces’ sides are made up of dozens of horizontal lines. If the printer works well and there are no problems during the printing process, you will see a smooth finished print, with no visible lines.
However, if the printed model has any errors, even in just one layer, you can see them with your bare eyes. Several factors cause these Layer lines; here are a few;
- High Temperature
- Sudden Temperature Changes
- Mechanical Related Issues
- Over-Extrusion
- Damaged Extruder Nozzle
- Printing too Fast
- Slippery Print Surface
- Poor Quality of Filament
Fixing Causes of Layer Side Lines on 3D Prints
To fix layer lines, here are a few things to correct;
High Temperature
When the temperature is above average, the plastic melts more and can be extruded freely with fewer regulations. Higher printing temperatures usually make the layers stick together better, but they can cause other problems, such as blobbing and oozing.
As a result of the higher temperature, the layers become more fragile, which makes lines appear on the sides of printed items.
To correct this;
- Try printing at a lower temperature; start low and increase gradually.
- If under these conditions you are experiencing extrusion, slightly raise your temperature.
- Once you identify your ideal temperature—which may need a few test prints—you should see the improved print quality.
Sudden Temperature Changes
Most 3D printers today use a PID controller to help manage the extruder’s temperature. Over time, you could have fluctuations if the PID is not correctly adjusted.
The printing process is hampered by these temperature swings that make the filament hot or cold. The layers may extrude differently due to this disruption, giving your print ridges on the sides.
- To maintain a constant, ensure that your PID controller is calibrated correctly.
- The temperature difference should not exceed 2 °C.
- To prevent sudden changes, use a brass nozzle for higher thermal conductivity.
Mechanics Issues
Mechanical issues related to layer lines on the outer part of a 3D print are referred to with the phrase “Z-banding.” The following are the common causes of Z-banding:
A Bent Lead Screw
It is one of the most frequent causes of Z-banding because the lead screw can flex and create odd surface patterns.
You may check to see whether your lead screw is bent by taking it out and rolling it on a flat surface. If bent, it will move at certain layer heights, hurting your print quality and possibly causing those margins.
Make sure you don’t tighten the top of the lead screw, because that would make the issue worse. The middle and bottom are the ideal locations for the lead screw to be fastened. If your lead screw is very bent, you should try replacing it with a good one.
Worn-out Rod
If the rod is worn out from being used all the time, the z-axis won’t work right. It will impact the correct printing pattern. Lubricating the rod helps it glide over the surface more easily.
Loose Belt and Wheels
The belt and wheels of the print are adjusted because if they are not correctly fastened, strange lines will appear on the print’s sides and surface.
Sluggish Bearings
Another typical mechanical issue that can cause Z-wobble and other flaws, like lines on the side of your print, is sluggish linear bearings.
Over Extrusion
During printing, the extra filament from the nozzle starts to build up on the layers, making them look thicker. Due to the nozzle touching these heavy layers, the lines begin to emerge.
Another issue is the high flow rate of over-extrusion, which results in more filament. As a result, the layers are uneven, and the lines are also unequal. All you have to do is
- Reduce the filament’s flow rate when it leaves the nozzle.
- Reduce the extruder’s temperature to prevent additional filament melting.
Damage to the Extruder Nozzle
A damaged extruder nozzle is a concern because, over time, the nozzle may become worn down from regular use or by printing with an abrasive filament. It scrapes off the tip-off because it is too close to the bed in one case, and you might have scraped it off while cleaning it in the other. The answer to this problem is straightforward:
- A more recent, superior nozzle is used in its place.
- After changing the nozzle, check the printing temperatures and print quality.
- Get a hardened steel nozzle if you are printing with an abrasive filament.
Printing too Fast
When the extruder is moving quickly, it tends to start putting extra filament on the sides of the print. Such line patterns are apparent on the curved sides and the flat surface. The following actions should assist:
- Slow down the printing process. Less filament will build up on the sides, and layers will have more time to attach correctly.
- Reduce the printing speed gradually across a 5–10 mm/s range.
- You can change these settings by checking the slicer settings for your advanced printing speed.
Slipperily Print Surface
The slippery surface could be the print bed (build plate) or the location where your printer is set up. 3D printing doesn’t need more vibration because its main goals revolve around precision and accuracy. The answer to this problem is:
- Placing your 3D printer on a solid surface
- Check the accuracy of your print base by leveling it many times.
- Put a Bed level touch in place for auto-leveling
Poor Quality of Filament
Filaments of poor quality might change the extruder’s feeding pressure, resulting in lines showing up along the edges of the 3D print. The following are some possible solutions to consider:
- A reliable merchant or manufacturer may sell you filament.
- A 3D filament guide that passes through the extruder before it starts printing may be used.
- Make sure your filament’s diameter is within the tolerance by measuring it.
Getting Rid of Layer Lines Through Post-processing
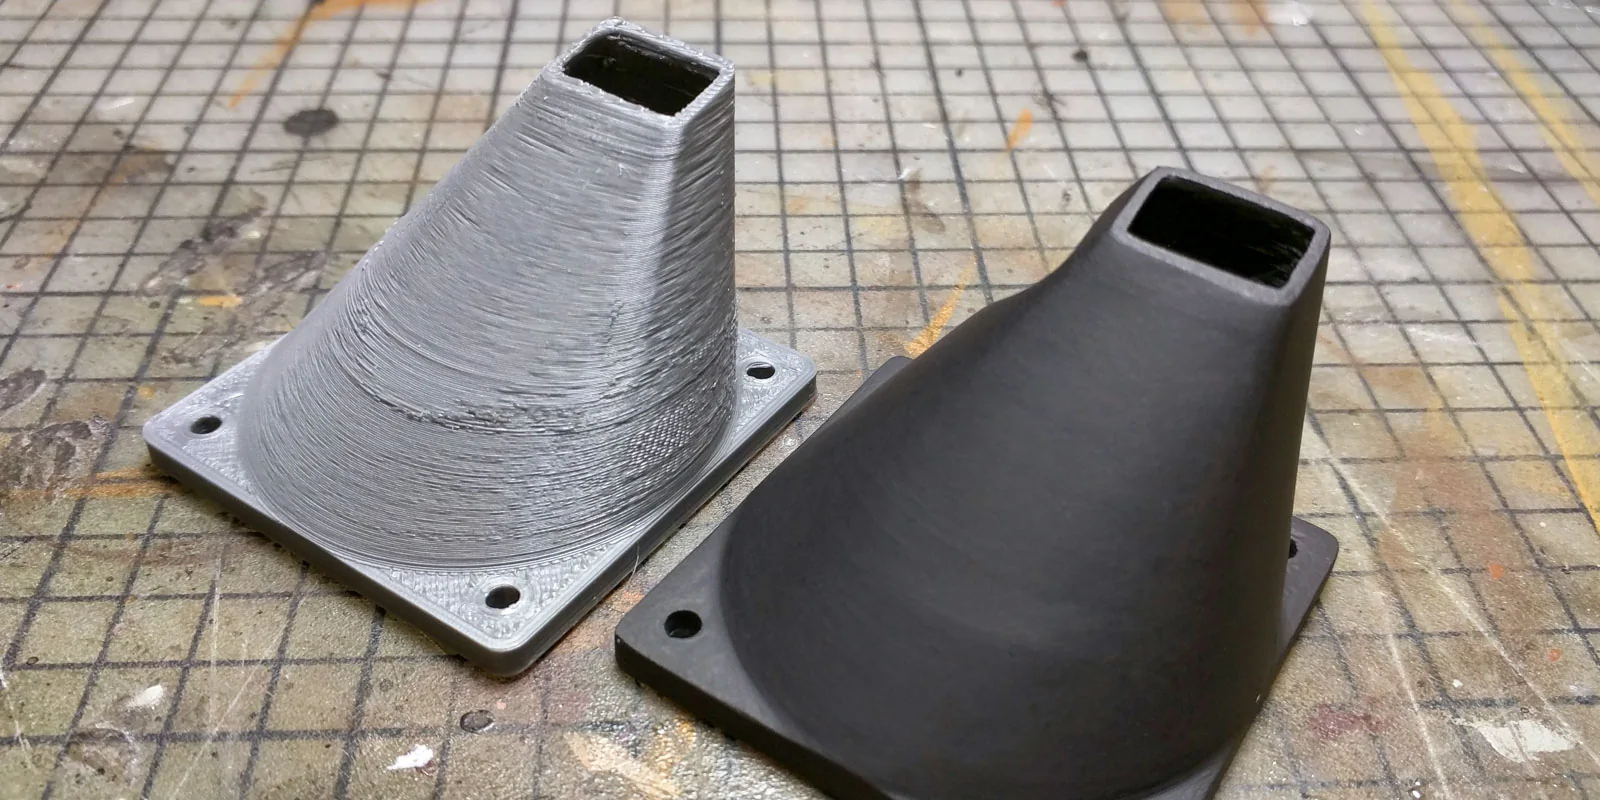
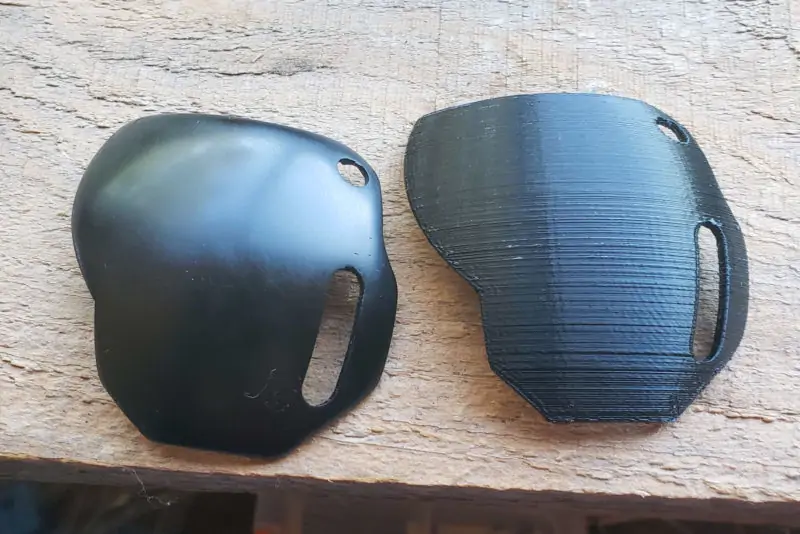
Apart from the above tips, another way to get rid of those layer lines for smooth prints is through post-processing. It is done by carrying out a smoothing process on the 3D print to hide any imperfections you may have seen in your prints.
Smoothing is done by sanding or buffing the model’s surface with progressively finer grits of sandpaper until a smooth surface is achieved and there are no visible layer lines that can be seen.
It can be carried out by hand with tools like heat guns and chemical baths, or it can be done with special 3D-printing material filament that is made to make smoother prints.
Smoothing is one of the best ways to get a professional-looking smooth finish on your model, and it can make all the difference between an amateur-looking print and one that looks like a pro made it.
Sanding
Sanding is the most common and least expensive method of smoothing 3D prints. It’s done by rubbing sandpaper with progressively finer grits against the model’s surface until all the lines are gone. Generally, 20-grit sandpaper should be used for the initial step, followed by 400 to 600-grit paper before moving on to 800-grit or even 1,000-grit sandpaper.
When sanding a 3D print, it’s essential to try wet sanding, follow the model’s layers for best results, and make sure that you apply light pressure. Over-sanding can cause your model to lose its overall shape, so it’s best to err on the side of caution.
Heat Gun

The heat gun is another great way to smooth your 3D prints. Heat guns can be used for spot-smoothing areas with noticeable layer lines or larger surfaces on the model to give it a more polished finish. When using a heat gun, keep the nozzle 10–20 cm away from the model’s surface and always have a fan handy to cool it down.
Chemical Baths
Another popular method for smoothing 3D prints is chemical smoothing, also known as “acetone smoothing.” For this method, you soak your print in a solution of acetone or other chemicals for a long time, usually 15 minutes to an hour.
This process works best on ABS prints, while Ethyl acetate can be used for PLA materials, as the chemical will dissolve the plastic, leaving a smooth, glossy finish when it’s done.
Surface Coating

Surface or epoxy coating is another post-processing method that can improve the look of 3D prints. Coating involves applying a layer of paint, lacquer, or varnish to the model’s surface to give it a more polished and finished look.
Layer lines and other imperfections in the surface texture can be filled with this, leaving a gleaming, even finish.
Use of Filler
Spray-on filler is useful for fixing large blemishes and can fill in gaps, ridges, and other layer lines. Filler primer and body filler are applied to the 3D model before applying coats of paint; they help improve 3D print quality by filling in any visible flaws.
FAQs on How to Get Rid of Layer Lines 3D Printing
The best way to get rid of PLA layer lines is to use sandpaper with progressively finer grits to sand the print’s surface. You can also use a heat gun or chemical bath to smooth out imperfections and achieve a glossy finish.
The best way to get rid of 3D print layer lines is by sanding the print’s surface with progressively finer grits of sandpaper. You can also use a heat gun or chemical bath to smooth out imperfections and achieve a glossy finish.
Yes, PLA can be acetone smoothed. It is done by putting your print in a solution of acetone or other chemicals for a long time. Acetone dissolves the plastic and leaves a smooth, glossy finish. Using this method on ABS-based 3D prints is best, as it won’t work well with PLA.
Yes, acetone can increase layer lines on ABS-based 3D prints if the print is left in the solution for too long. The acetone breaks down the plastic, which can change shape over time and make the layer stand out more.
The best way to get rid of 3D print layer lines is by sanding the print’s surface with progressively finer grits of sandpaper. Also a mixture of acetone and ABS plastic can be used to fill in the layer lines of 3D prints. This mixture creates a paste that can be applied over the 3D print’s surface where it will harden and create an even finish.
Conclusion
Layer lines are one of the most frustrating aspects of 3D printing. But with the proper techniques and materials, you can get rid of them for good. In this guide, we’ve shown you how to eliminate layer lines using various methods.
So now it’s up to you to choose the proper method for your needs. Take advantage of these guides, and you can rest assured that your 3D printing will take a new turn in terms of quality output. Send us a message, and we’ll gladly offer guidance and support.